1. Overview
What the app does and the two content strategies it supports.
The Shopify AI Blog Generator App helps ecommerce merchants create, schedule, manage, publish, and distribute blog content directly inside Shopify. It supports two main content strategies:
- Product-based blog generation — for product promotion
- Keyword-based blog generation — for SEO and search-intent content
The app helps merchants publish content consistently, promote products through blog articles, and automatically distribute published content to connected social media platforms.
| Area | What you can do | Where to find it |
|---|---|---|
| Subscription | View usage, billing date, plan limits, and change plan | Dashboard / Pricing plans |
| Social accounts | Connect or disconnect Facebook, Instagram, TikTok and LinkedIn | Dashboard |
| Blog generation | Create product-based or keyword-based blog batches | New Blog Post flow |
| Scheduling | Choose weekly publishing days and manage upcoming articles | Blog generation flow / Dashboard list |
| Article management | Quick-view, edit, delete, and reorder not-yet-published articles | Dashboard article list / Batch review |
| Publishing output | Publish storefront blogs with product cards, FAQ, and social posts | Storefront / Connected social accounts |
2. Quick start
First-time setup in 8 steps.
- Install the app from the Shopify App Store and open it from Shopify admin.
- Choose or confirm the subscription plan that matches your weekly blog volume.
- Connect social accounts if you want automatic social posts (for Growth plan only).
- Click New Blog Post from the dashboard.
- Choose blog volume, publishing days, and social cross-posting accounts.
- Choose product-based or keyword-based generation.
- Select products or keywords, then generate the blog batch.
- Review generated articles, edit if needed, and keep approved posts scheduled.
3. Before you start
Requirements checklist.
- An active Shopify store
- Permission to install and manage Shopify apps
- Products added to your Shopify catalog (for product-based blogs)
- Access to the social accounts you want to connect (Facebook, Instagram, TikTok)
- A subscription plan that supports your desired blog volume and publishing schedule
4. Install and open the app
Installation from the Shopify App Store.
- Go to the Shopify App Store.
- Search for the app by name.
- Open the app listing and click Install.
- Review and approve the Shopify permissions.
- After installation, open the app from Shopify admin under Apps.
After installation, you land on the app dashboard. From there you can manage your plan, connect social accounts, generate blogs, and manage scheduled articles.
5. Use the dashboard
Your main control center.
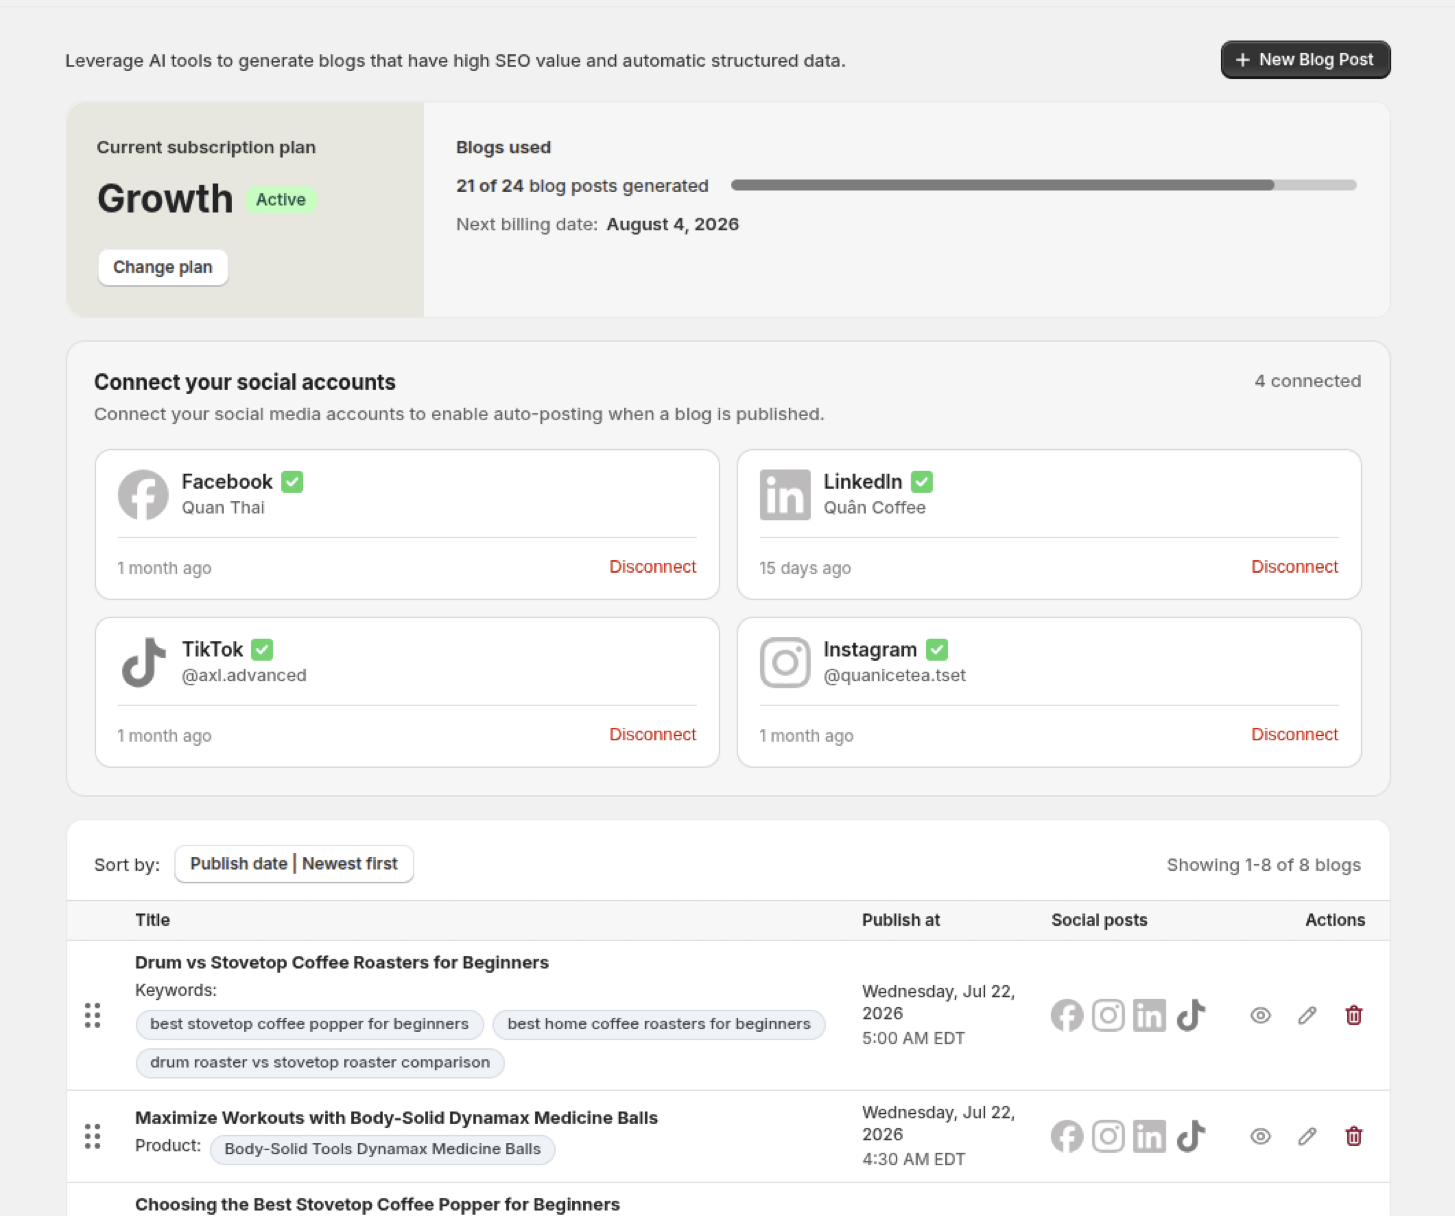
From the dashboard, you can:
- View your current subscription plan, blog usage, and next billing date
- Change your subscription plan
- Connect or disconnect social accounts
- Start a new blog batch
- View scheduled or not-yet-published articles
- Quick-view, edit, delete, or reorder upcoming articles
5.1 Manage subscription and plan usage
Check your plan, usage, billing date, and plan limits.
The dashboard subscription area shows:
- Current subscription plan and active status
- Number of blogs used and your blog usage limit
- Next billing date
- Change plan option

The pricing page shows available plans and limits, including: blogs per week, number of scheduled articles, scheduling range, admin email notifications, editable schedule, and auto-generated social posts per published blog.
6. Create a blog generation batch
A batch is a set of blog articles created in one workflow.
A batch can include one or multiple articles depending on your plan and setup. The workflow includes:
- Choosing blog volume
- Choosing publishing days
- Selecting social cross-posting accounts
- Choosing a generation mode
- Selecting products or keywords
- Generating articles
- Reviewing the generated batch
Start a new batch
- Go to the dashboard.
- Click New Blog Post.
- Follow the step-by-step generation flow.
Before starting, review your current plan and blog usage to confirm how many articles you can generate.
6.2 Step 1: Choose the number of blogs
Select how many articles this batch will generate.
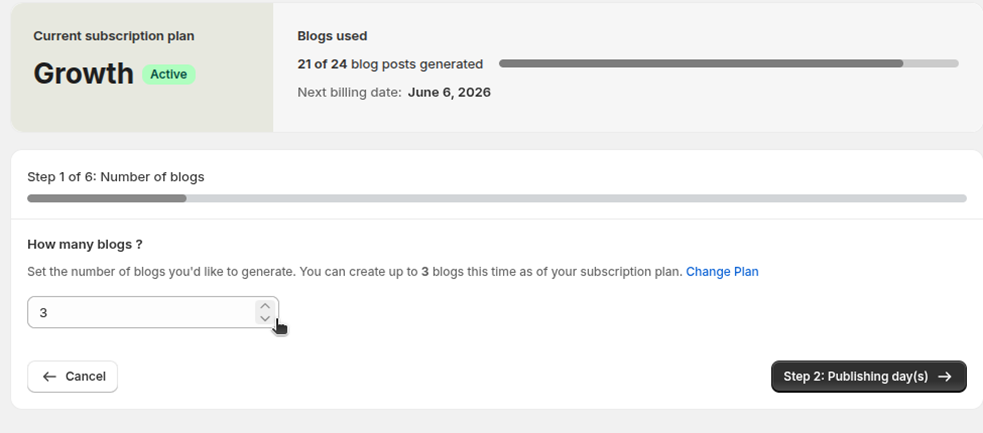
- Select the number of blogs.
- Check the plan limit shown on the screen.
- Click Change Plan if you need more blog volume.
- Continue to Publishing day(s).
Example: if your plan allows up to 3 blogs for the current flow, you can select up to 3 articles in this batch.
6.3 Step 2: Choose publishing days
Pick the weekdays your generated blogs should be published.
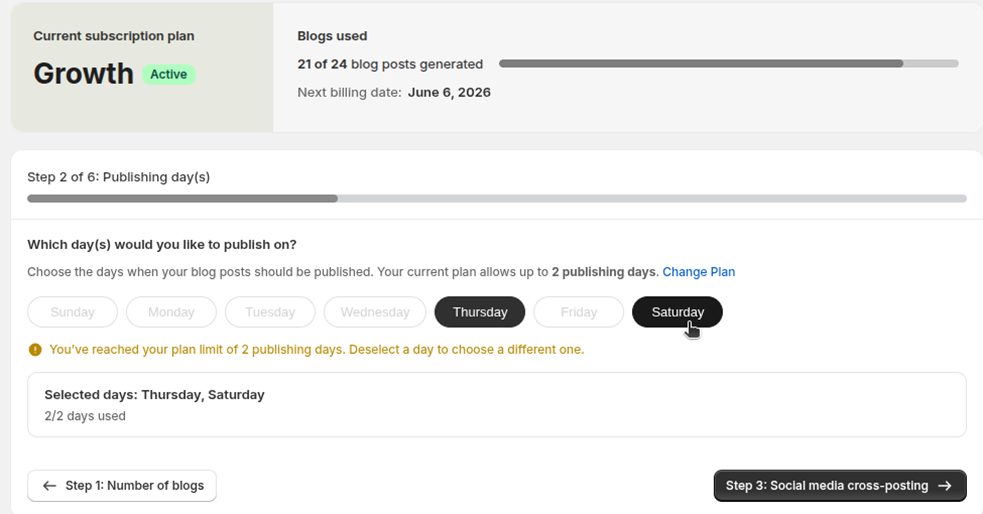
Selected publishing days help the app schedule articles automatically after generation.
- Select one or more weekdays.
- Review the selected days summary.
- Check whether you've reached your plan limit for publishing days.
- If the limit is reached, deselect a day or click Change Plan.
- Continue to Social media cross-posting.
6.4 Step 3: Select social media cross-posting
Choose which connected accounts auto-post when each blog goes live.
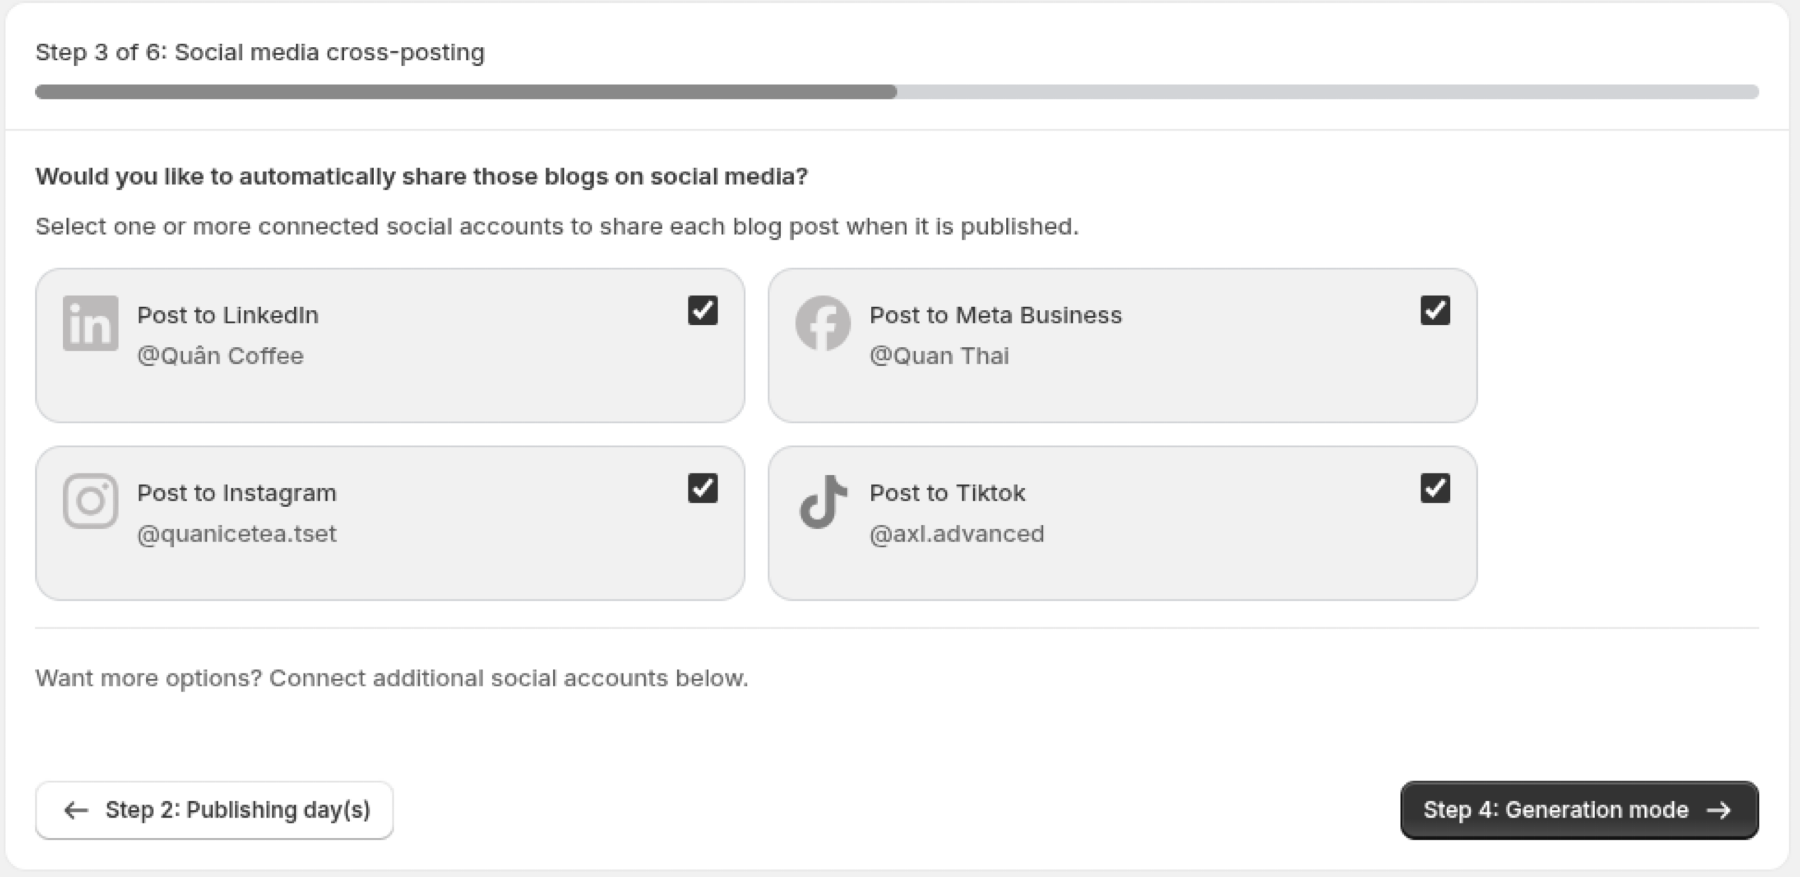
- Review the connected social accounts on the page.
- Select one or more social accounts for auto-posting.
- Continue to Generation mode.
Please note that automatic blog posting to social media is available only on the Growth plane
6.5 Step 4: Choose a generation mode
Product-based vs keyword-based content.
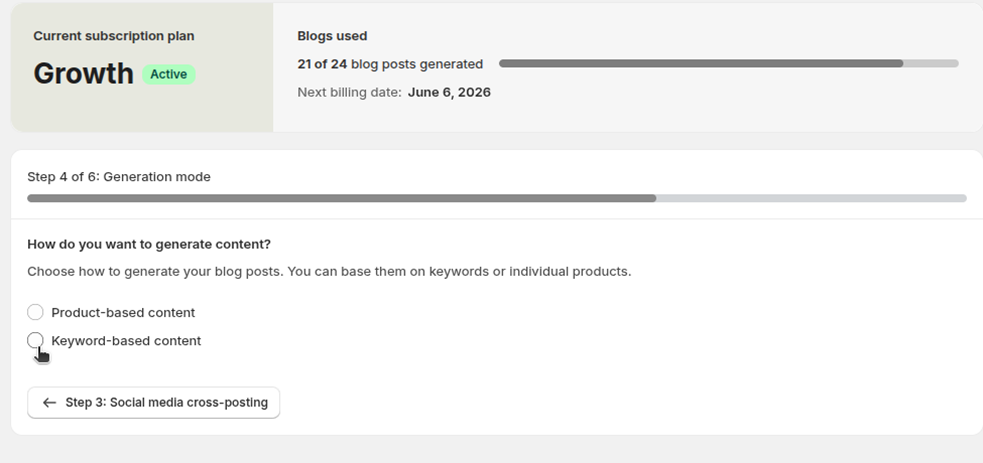
Option A: Product-based content
Each article promotes a specific product from your Shopify catalog. Use it for:
- Promoting selected products and supporting product launches
- Highlighting product benefits
- Creating content that leads readers to product pages and conversion
- Encouraging add-to-cart actions from the blog experience
Option B: Keyword-based content
Articles focus on search intent, educational topics, or SEO keywords. Use it for:
- Targeting organic search traffic
- Answering customer questions
- Creating educational blog content
- Building topical authority around your products or industry
You can enter keywords manually or click AI Generated for suggestions. Up to 5 keywords per generation batch.
6.6 Step 5A: Product-based blog generation
Appears when you choose Product-based content.
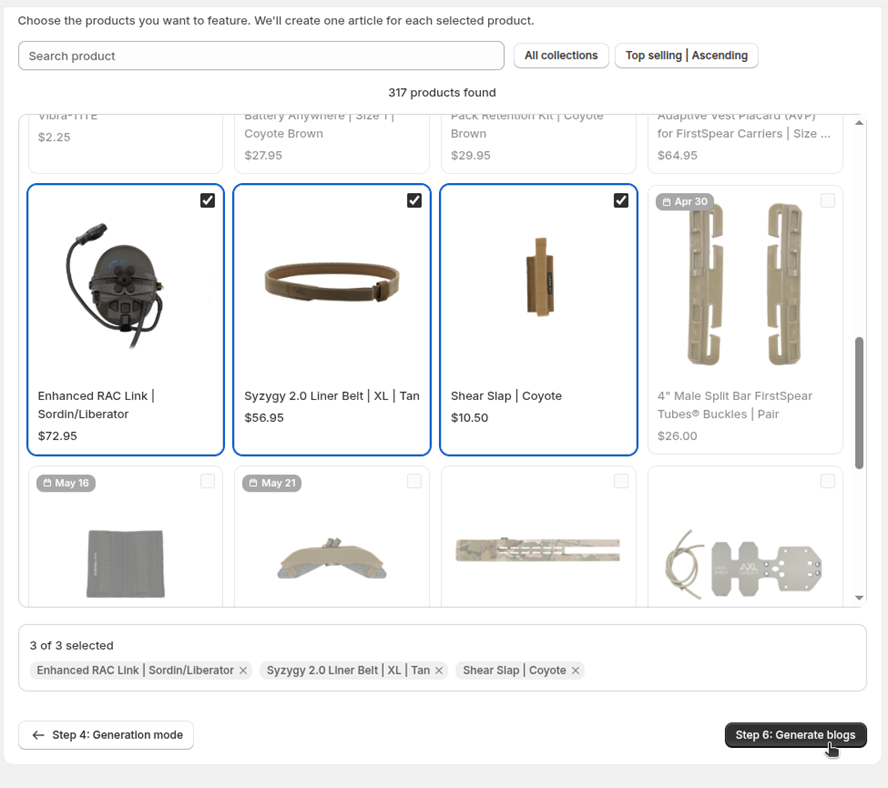
The app connects to your Shopify product catalog. You can search, filter by collection, sort, select one or multiple products, review selections at the bottom of the page, and remove selected products before generating.
- Search, filter, or scroll through your product catalog.
- Select the product(s) you want to feature.
- Review the selected products.
- Confirm the number of selected products matches the number of blogs you want to generate.
- Click Generate blogs.
The app creates one blog article for each selected product. Product-based articles can include product-focused copy, lifestyle imagery, product cards, FAQs, and conversion paths from blog content to product action.
6.7 Step 5B: Keyword-based blog generation
Appears when you choose Keyword-based content.
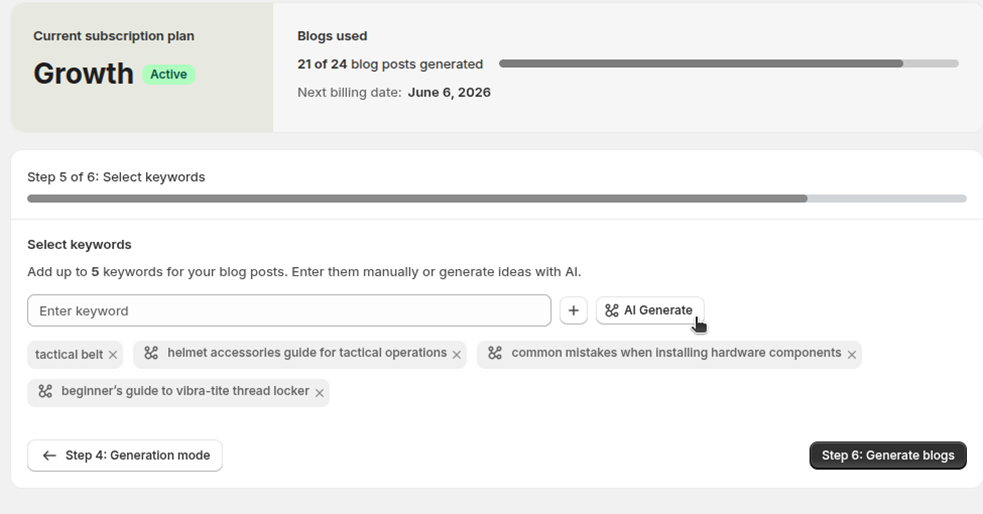
- Enter a keyword manually or click AI Generate for keyword ideas.
- Add the keywords you want to use (plus button).
- Review the selected keyword chips.
- Remove any keyword that doesn't match your content strategy.
- Click Generate blogs.
Keyword-based articles are useful for targeting customer search intent, product education, and SEO-focused topics.
6.8 Step 6: Generate blog articles
What happens after you click Generate blogs.
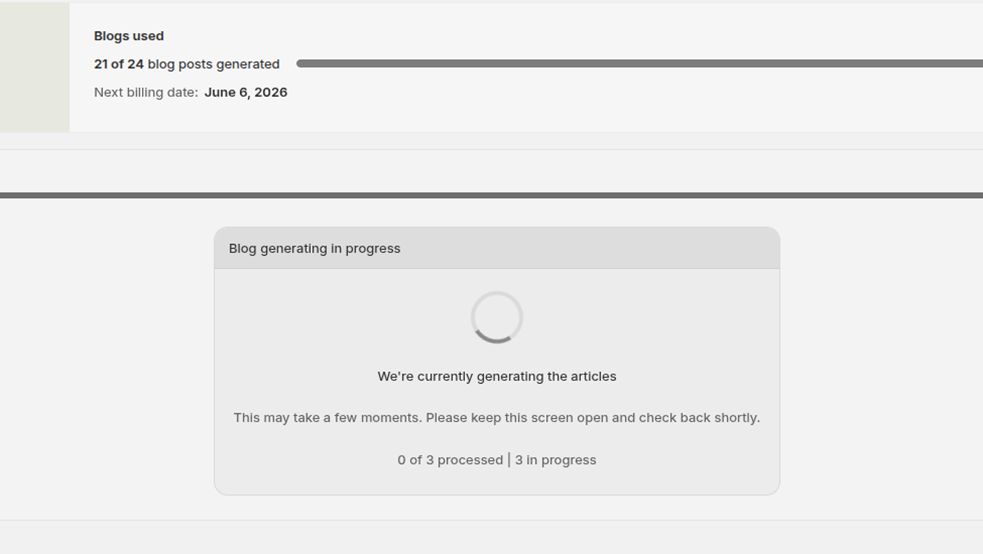
The app starts generating the blog batch. A progress screen shows the current generation step, the number of articles processed, the number still in progress, and a message asking you to keep the screen open.
6.9 Review the generated blog batch
Approve, adjust, or remove articles before they enter the schedule.
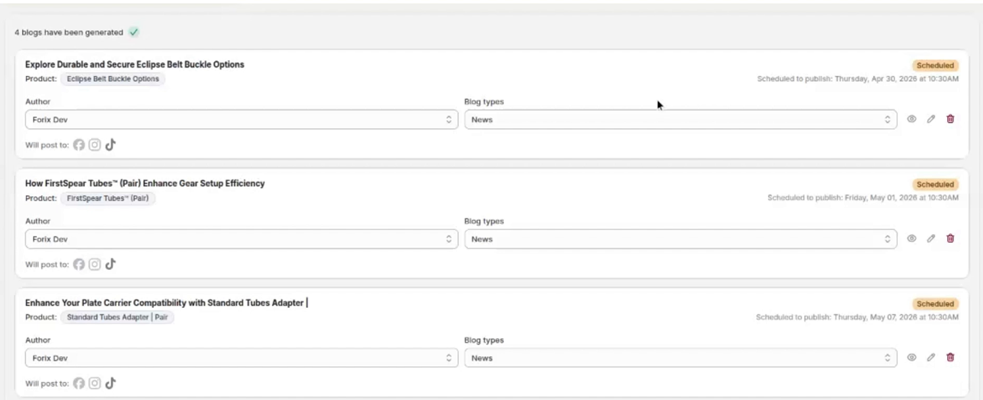
For each generated article, you can Quick-view, Edit, or Delete it, and review the scheduled publish date, blog type, author, and selected social platforms.
Recommended review process
- Quick-view each generated article.
- Check title, introduction, content structure, product references, and FAQ section.
- Review social captions if auto-posting is enabled.
- Edit anything that needs brand, tone, SEO, or product-messaging adjustments.
- Delete articles that should not be scheduled.
- Keep approved articles so they move into the publishing schedule.
7. Manage scheduled articles from the dashboard
Monitor and adjust upcoming content before it goes live.
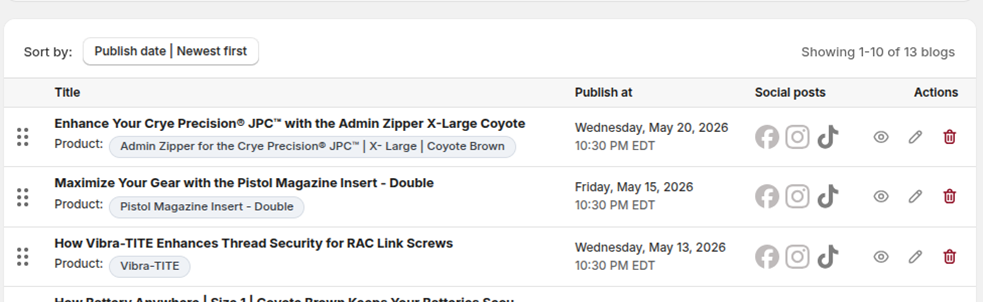
The dashboard list shows upcoming or not-yet-published articles. For each one you can see the title, related product, scheduled publish date and time, selected social platforms, and available actions:
- Quick-view an article (eye icon)
- Edit an article (pencil icon)
- Delete an article (trash icon)
- Drag and drop rows to reorder not-yet-published articles
- Sort articles by publish date
8. Edit blog articles and social captions
Adjust AI-generated content before publishing.
Open the article editor from the batch review view or the dashboard article list. You can update:
- Article title, meta description, URL handle, tags
- Author and blog type
- Article content and product-related content
- Social post captions for enabled platforms
Editing is useful when you want to adjust tone of voice, add brand-specific details, improve product messaging, refine SEO content, or update social captions before publishing.
9. View published blogs on the storefront
What a published article includes.
When an article is published, it appears on your Shopify storefront as a blog post. A generated blog can include a strong title, publish date, introductory content, lifestyle or product imagery, SEO-friendly headings, product-focused content, an embedded product card, an add-to-cart option, and an FAQ section.
Product promotion and add-to-cart path
For product-based articles, visitors may be able to:
- View the featured product inside the article
- Open a quick product view or the product detail page
- Add the product to cart from the blog experience
This shortens the path from reading content to taking purchase action.
10. Automatic social media posts
Auto-publish social posts when a scheduled blog goes live.
The app can automatically generate and publish posts to connected platforms — Facebook / Meta Business, Instagram, TikTok, LinkedIn, and Google. Social posts can include a blog or product image, a platform-specific caption, and a link back to the blog or store.
To use this feature successfully
- Connect the social accounts from the dashboard.
- Select the accounts during the blog generation flow.
- Review or edit social captions if needed.
- Keep the blog in the publishing schedule.
11. Best practices
Get the most out of the app.
- Use product-based blogs for product promotion — best sellers, launches, and content that leads to a PDP or add-to-cart action.
- Use keyword-based blogs for SEO topics — customer questions, educational content, and search intent.
- Review before publishing — quick-view and edit titles, product details, SEO fields, FAQ content, and social captions.
- Connect social accounts first — so they're available during the cross-posting step.
- Monitor plan usage — check usage and limits from the dashboard; change plans when needs grow.
- Keep a consistent publishing schedule — choose days your team can maintain; fresh content gives customers more reasons to return.
- Use the dashboard to manage upcoming content — reorder, edit, or delete not-yet-published articles as priorities change.
12. Troubleshooting
Common issues and what to do.
| Issue | What to do | Related sections |
|---|---|---|
| I reached my blog limit | Your plan may limit how many blogs can be generated in the current period. Use Change Plan to review more options. | 5.1, 6.2 |
| I cannot select more publishing days | Your plan may limit publishing days. Deselect a day or change plans to increase the limit. | 5.1, 6.3 |
| I do not see my social account during setup |
Connect the account from the dashboard first, then return to the blog generation flow. Please note that automatic blog posting to social media is available only on the Growth plan. |
5.2, 6.4 |
| A generated article needs changes | Use Edit from the batch review view or dashboard article list. | 7, 8 |
| I do not want to publish an article | Use Delete from the batch review view or dashboard article list. | 6.9, 7 |
| Product-based generation does not show the product I want | Use search, collection filter, or sorting. Confirm the product exists in your Shopify catalog. | 6.6 |
| Blog generation is taking time | Keep the generation screen open while articles are processed. The progress screen shows current status. | 6.8 |
| My social post needs changes before publishing | Open the article editor and update the social caption fields for the enabled platforms. | 8, 10 |
| I want to change my publishing schedule | Use the dashboard article list to review upcoming articles. Edit, reorder, or delete not-yet-published articles. | 6.3, 7 |
13. Frequently asked questions
Quick answers — click a question to expand.
Can I generate blogs for multiple products at once?
Can I generate blogs without selecting products?
Can I edit AI-generated content?
Can I control when blogs are published?
Can I automatically post blogs to social media?
Can I remove a blog before it is published?
Can I reorder scheduled articles?
Can I change my plan later?
Can I use the app only for SEO articles?
Can I use the app mainly for product promotion?
14. Support
How to contact the support team.
For help, contact the app support team from the Shopify App Store listing or the support channel provided by the app developer. When contacting support, include:
- Shopify store name
- Current subscription plan
- Description of the issue
- Steps you took before the issue happened
- Relevant screenshots or examples, if available
5.2 Connect social accounts
Facebook / Meta Business, Instagram, TikTok, LinkedIn, Google.
To connect a social account
To disconnect a social account
Connected accounts can later be selected during the blog generation flow for automatic social cross-posting.